Folding Knife Drill Pattern & Template - Rotty Large
Templates for Folders…
Use these as a pattern and drill guide to make a folder. If you have never made a liner lock folder, this is for you. We can’t give you a tutorial here but I’ve posted one on our knife forum - www.Knifedogs.com for you to follow along.
Follow this link to see several methods using this template system: http://knifedogs.com/showthread.php?42208-Making-a-Liner-Lock-Tutorial-using-drill-template-patterns.
Basically, use these templates to profile and locate your holes exactly where they should be, then build a liner lock folder. It’s not as simple as that but using this process greatly improves your chance of success and gives you excellent repeat-ability.
Our first in a series, these pattern templates are made from hardened 440c. On a smaller folder, say 4” and shorter, I’d suggest Titanium 6al-4v in .070” to .100” thickness with a blade thickness of .125” The larger version can use .070” to .12” Ti or stainless for the liners.Blade thickness can be .100” to .156”
We’ve done the geometry already. The hard part of designing a liner lock is where to place the stop pin, detent ball, lock face and pivot where it all works. This template system has all of that done already for you with the pre-located holes and profile.
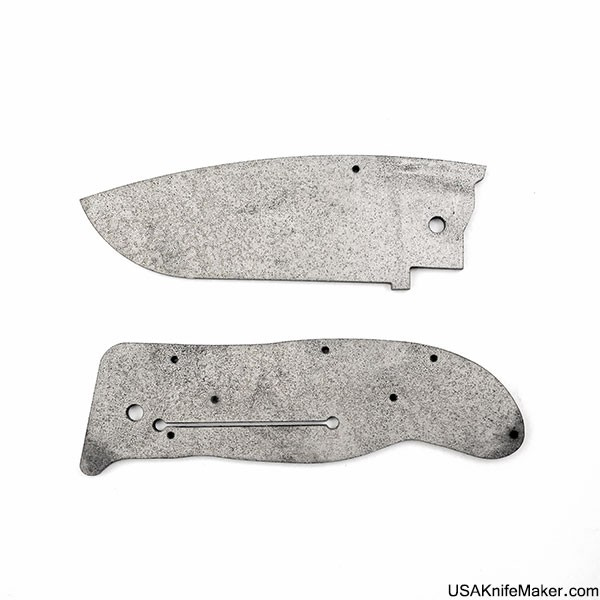
To use:Clamp the liner pattern onto a piece of Ti or stainless, trace the outline onto the liner material. I would suggest using layout fluid to help show the marks. While still clamped, use the right size drill bit and drill through the template in each hole to mark the template. You just want to leave a small starting mark to help locate your drill bit. Remove the template and finish drilling and reaming each hole to size. Then grind away to your out outlines. Repeat for both liner sides and then the blade. We used a #49 hole for all the screw hole locations in the template. This is the correct size to tap for a 2-56 screw. (I tend to enlarge the hole with a #48 drill which is still plenty for a 2-56 screw in Titanium, I just get tired of breaking taps.) For the 3/16” pivot hole, make your mark through the template with a 3/16”, then finish the hole with a #13 drill and ream to 3/16”. (Reaming to size is important. If you drill through with a 3/16”, your hole will not be round and tend to have 3 lobes. Reaming gives you a more accurate and round hole.)
The lock bar cut out can be done with a rotary tool (like a Dremel) using the template as a guide for the cut off wheel. We show this in the online tutorial on www.Knifedogs.com (Note: Using the template as a guide will wear it out eventually. At some point you will need to get another template from us (yea!) or make your own guide slot.) (I drill the end holes of the lock bar slot and then use a mini-mill to “connect” the holes.) Don’t be afraid of cutting the lock bar. After one or two under your belt, it gets lot’s easier. (Use the thin cut off wheels to cut the lock. You will probably go through 3 to 5 of the cut off wheels but it just doesn’t take that long to do.)
Hole sizes:
#49 for the screw holes.Drill with a #49 and enlarge for a through hole or countersink for shouldered stand off’s.
3/16” for the pivot holes. Drill mark through the template with 3/16” Using the 3/16” mark, drill with a #13 and then ream to 3/16”.
1/8” for ends of the lock bar slot.
Oops, we missed the hole for the detent ball in this production run! Locate the hole by eye for a #49 for the detent hole for a 2mm detent ball. If you want to use a 1/16” detent, use a #53 drill instead. Basically, you want the detent hole about an 1/8" from top of the lock bar and lock face. This isn't hyper critical but it does matter so pay attention locating this hole. Our next production run on these will have the detent hole located.
Why use a template system? To get the holes lined up accurately and have a repeatable pattern with proven geometry for the pivot/stop pin/lock face.
So you are thinking, I can make my own like that! Yes, you can. I’d encourage you to. Maybe you don’t need one of the template things at all. Maybe you want to try one set to get your feet wet. Making folders that go together and work well isn’t easy but this process will take a lot of pain out of it.
We will be putting out additional designs over time. Keep your eyes open for additional styles down the road… Post your questions in this thread on Knifedogs.com http://knifedogs.com/showthread.php?42208-Making-a-Liner-Lock-Tutorial-using-drill-template-patterns (Knifedogs.com is free but you must register to post or see pictures)
Metal:
1/8 CPMS35VN for the blade
- this should be slightly oversized
and you bring it to thickness
.071" Titanium for the liners
- I've done these in .070" up to .125"
I'd suggest .070" for your first.
Parts list:
(2) 3/16" thick g10 or Micarta(tm)
- material for the scales
(1) 3/16" thick g10
- material for the spacer bar.
(1) 3-hole Titanium pocket clip
(2) 6-64 disc pivot heads
(1) barrel pivot threaded
- 6-64 ID and 3/16" OD"
(6) 1/2" 2-56 button head screws
(4) 3/8" 2-56 button head screws
- can use 1/2" and grind to size
(1) 1/8" stop pin - length depends on thickness of blade
(1) 2mm ceramic detent ball
(2) .015" thick PB washers
- 3/16" ID and 3/8" OD
(1) Thumb Shredder thumb stud
(1) 1/4" 2-56 button head screw
- for thumb stud